PokePath TD Route 1-2 Guide: Beating Zapdos (Wave 100 Strategy)
Route 1-2 is notorious for its split paths and lack of water, but the real challenge is Wave 100: Zapdos. This Legendary Bird is fast, tanky, and immune to many crowd control effects. If your standard AOE team can clear Waves 1-99 but fails at the Boss, use the tactical "Clawitzer Swap" strategy.
Route Guide
Route 1-2 is notorious for its split paths and lack of water, but the real challenge is Wave 100: Zapdos. This Legendary Bird is fast, tanky, and immune to many crowd control effects.
If your standard AOE team (Maractus/Aggron) can clear Waves 1-99 but fails at the Boss, don't worry. You don't need to restart the whole run.
In this guide, we will use the game's "Infinite Retry" mechanic and a tactical "Clawitzer Swap" to obliterate Zapdos.
⚙️ Key Game Mechanics You Must Know
Before we discuss the team, you need to understand two crucial mechanics about PokePath TD:
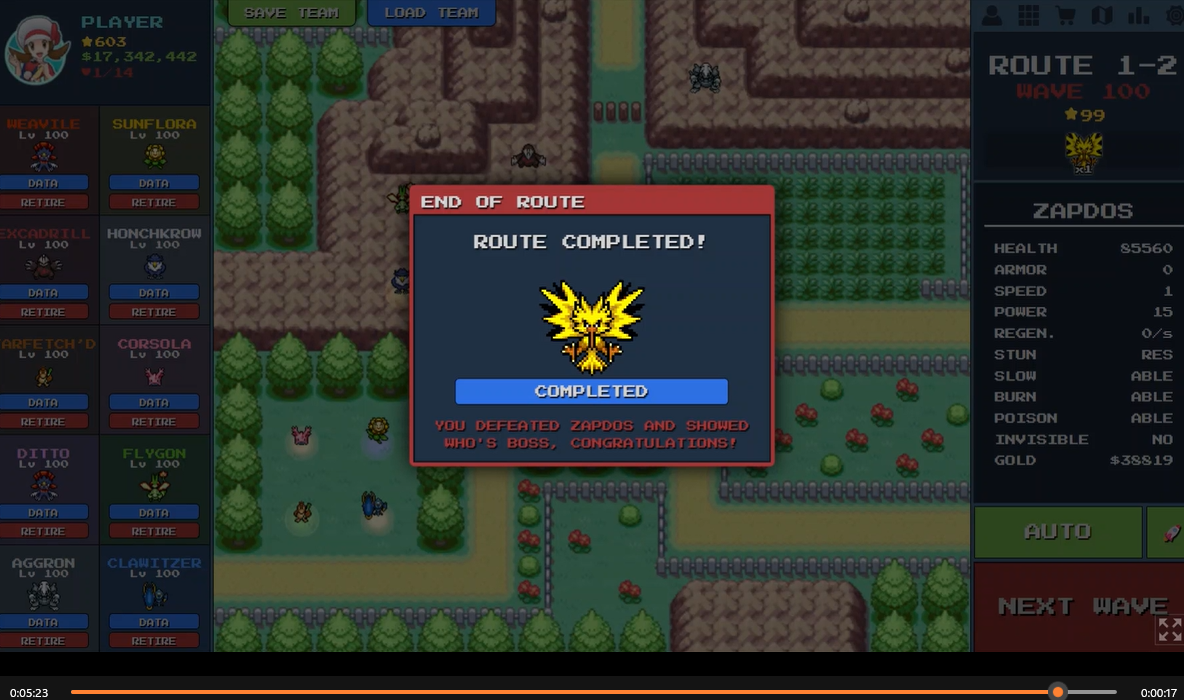
1. The "Infinite Boss" Mechanic
- If you lose to the Wave 100 Boss, the game does NOT end your run. It simply restarts Wave 100.
- What this means: You can try to beat Zapdos as many times as you want. If you fail, just adjust your team, move your units, and try again instantly. There is no penalty!
2. The "Retire" Mechanic
- When you swap a unit (Retire), you do NOT get Gold back.
- Strategy: By Wave 100, you should have plenty of gold banked. Don't be afraid to retire your Wave-Clearing units (like Maractus) to make space for Boss-Killing units (like Clawitzer). You are swapping for power, not money.
3. Bosses are NEVER Invisible
- Zapdos (and all Wave 100 Bosses) do not have the "Invisible" trait.
- Optimization: You can safely retire your Honchkrow (Anti-Invisible) for the final wave and replace it with another high-DPS unit like Aerodactyl or Flygon for extra damage.
⚔️ The Strategy: The "Clawitzer Nuke"
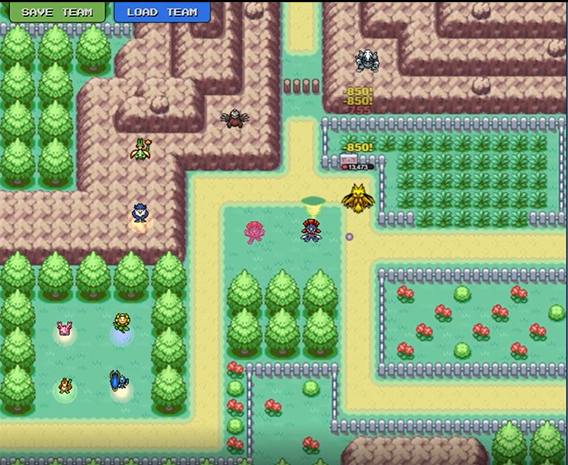
Zapdos is fast. We need to deal massive damage immediately. Our strategy focuses on a "Spawn Camping" setup at the bottom left.
Step 1: The Setup (Bottom Left Corner)
This is where Zapdos spawns. We want to hit him hard before he even moves.
- The Swap: Retire your Maractus (AOE) and deploy Clawitzer (Lv 100).
- Why? Clawitzer has 1,950 Power and deals Double Damage on Crits. It is the strongest single-target burst in the game.
- The Buffs: Place Farfetch'd (+33% Crit Dmg) and Sunflora (+20% Dmg) right next to Clawitzer.
- Result: Zapdos takes massive critical rockets the moment he spawns, losing 30-50% HP instantly.
Step 2: The Safety Net (Center Field)
If Zapdos survives the initial nuke, he will move to the center split.
- Weavile: Place your Weavile here to cover both top and bottom paths.
- Ditto: Copy Weavile and place it nearby. Two Weaviles are better than one.
- Corsola: Provides a 300-range Slow. Even though Zapdos is fast, this gives your Weaviles more time to land hits.
Step 3: Optimization (If You Fail)
If you still can't beat him:
- Let the wave restart (Auto-Retry).
- Retire Honchkrow: Since Zapdos isn't invisible, swap Honchkrow for another high-DPS unit on the mountain.
- Check Targeting: Ensure Clawitzer is set to "Strong" or "First".
📝 Summary: The Winning Play
- Clear Waves 1-99 with your standard AOE team.
- Pause at Wave 100.
- Retire Maractus/Honchkrow.
- Deploy Clawitzer + Buffs at the Spawn Point.
- Deploy Weavile + Ditto in the Center.
- Unpause and Win.
This strategy leverages Level 100 stats. Want to see the full potential of these units? Check out our Wiki Database.
🗺️ Terrain Analysis
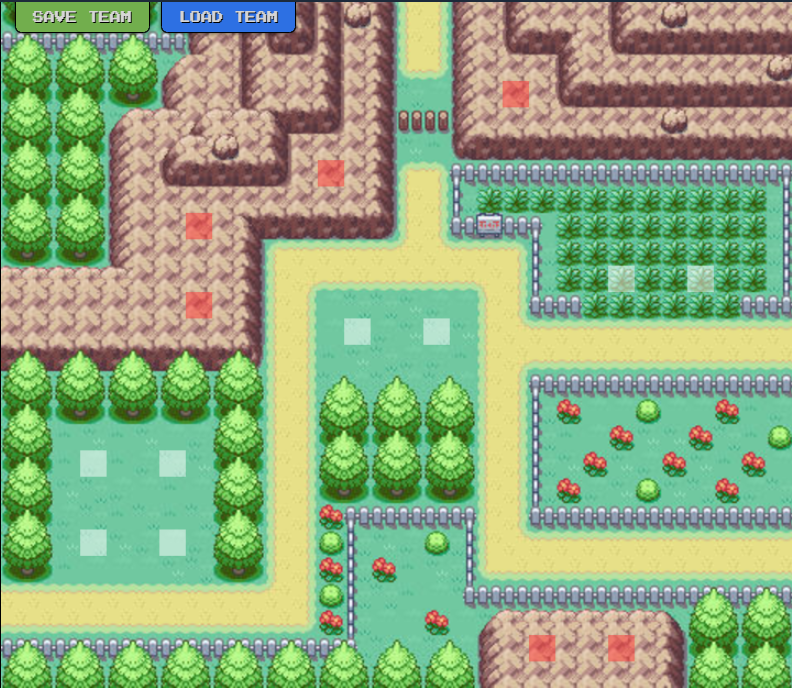
Route 1-2 features split paths and extensive grass fields, with no water areas. The key strategic points are the spawn point and center convergence.
Roads & Paths
- Split Paths: Split paths with center convergence (Long, 2 chokepoints)
- Main Path: Straight main path through the center (Long, 1 chokepoint)
- Left Path: Curved path on the left side (Medium, 0 chokepoints)
Mountains & High Ground
- Mountain Areas: Mountain areas for long-range units (High strategic value) - +20% range bonus, Good for Honchkrow or Aerodactyl
Grass & Vegetation
- Extensive Grass Fields: Extensive grass fields covering most of the map (Very High coverage) - Grass-type Pokémon gain 2x power bonus
- Crop Fields: Crop fields providing additional grass terrain (Medium coverage) - Grass-type Pokémon gain power bonus
- Bottom Left Spawn Area: Bottom left spawn area (Low coverage) - Perfect for Clawitzer placement
Strategic Chokepoints
- Bottom Left Spawn Point: Where Zapdos spawns - perfect for spawn camping (Very High priority)
- Center Split: Where paths converge - safety net zone (Very High priority)
- Center Path Narrowing: Main path narrows in the middle (High priority)
⚔️ Team Composition
Early Game (Waves 1-50)
Use Maractus for AOE wave clearing and Honchkrow for anti-invisible coverage.
Mid Game (Waves 51-99)
Continue with Maractus and Aggron for AOE damage. Add Corsola and Weavile for control and DPS.
Late Game (Wave 100)
Perform the "Clawitzer Swap": Retire Maractus and deploy Clawitzer + Farfetch'd + Sunflora at spawn point. Keep Weavile + Ditto + Corsola in center field as safety net.
Related Tools
Map Overview
Terrain Analysis
Roads & Paths
Split paths with center convergence
Straight main path through the center
Curved path on the left side
Mountains & High Ground
Mountain areas for long-range units
Grass & Vegetation
Extensive grass fields covering most of the map
Crop fields providing additional grass terrain
Bottom left spawn area
Strategic Chokepoints
Where Zapdos spawns - perfect for spawn camping
Where paths converge - safety net zone
Main path narrows in the middle